
Background Editor
Import the four-cell picture into Backdrop Art, assign it to your Scene, and check the result in a fresh playtest. With Fit (Letterbox), the whole square stays visible beside two gutters.
How the Parts Fit
A Background stores the picture and its viewport settings. Your Scene stores the assignment. The game draws that Background behind its content in screen space.
- Backdrop Art
You save the imported picture and its resize settings together, so each assigned Scene uses the same Background.
assign it
SceneYou add Backdrop Art to the Scene’s Screen Backgrounds.
start a run
PlayThe game displays the picture behind Scene content.
Changing the reusable Background changes the settings shared by its assigned Scenes. Moving a world Object leaves this screen-space picture in place.
Prepare the Example
Open a 2D project and stop its playtest before editing; this example uses the Scene named Scene.
Use the 64 × 64 four-cell picture. Its rounded shapes reveal when the view crops the picture or stretches it out of proportion.

- Choose Add > Background. Name it
Backdrop Artand choose Create. - In Background Editor Modes, choose Import/Create and keep Mode at Import.
- Confirm Source Type is Background Image.
- Choose Import Background Image… and select
four-cells.png. - Wait for the picture. Check that all four colored cells appear.
The whole image becomes one Background without cutting it into animation frames.
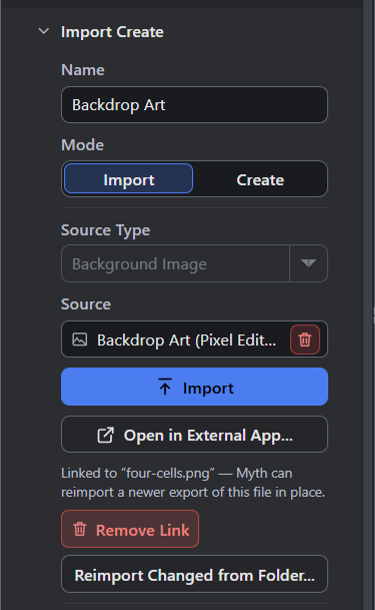
- Name the resource Backdrop Art.
- Background Image imports the whole picture without cutting it into individual animation frames.
- The four-cells.png link stays available for reimport.
The import view keeps a link to four-cells.png for later reimport. After visiting Pixel Editor, the picture’s Source label can name the edited Background instead.
Set How the Picture Fits
- Choose Pixel Editor in Background Editor Modes.
- In the left Properties panel, expand Background Output to reach the resource’s viewport settings.
- Set Resize Behavior to Fit (Letterbox).
- Keep Opacity (%) at
100and Blend at Normal while comparing how each resize choice changes the picture. - Leave Tint Enabled off.
These settings belong to Backdrop Art. The editing view’s zoom and BG: Dark control the workspace view.
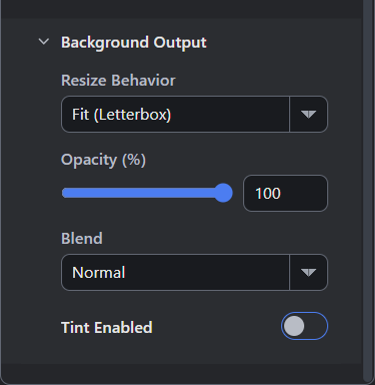
- Fit (Letterbox) preserves the whole picture.
- At 100 percent, Backdrop Art keeps its full opacity while you compare the resize choices.
- Leave Tint Enabled off.
Keep these appearance settings while comparing resize choices. Pixel Editor’s image layers hold the artwork; Screen Backgrounds assigns that artwork to a Scene.
Show It in the Scene
- Open
Sceneand choose Object Mode. - In Scene Explorer, double-click the empty Screen Backgrounds section.
- In Add Screen Background, choose
Backdrop Artand confirm its new row under the Screen Backgrounds section. - Enable Backgrounds in the preview toolbar and inspect Game View.
- Start Debug Play. Check the whole picture, then choose Stop.
With a viewport wider than the square image, Fit leaves gutters beside it. All four rounded shapes remain visible and keep their proportions.

Save the project with Backdrop Art assigned to Scene, close it, and reopen the saved file. Start a fresh Debug Play and check the same picture again.
Choose a Resize Behavior
Changes apply to the reusable Background. Stop and start a fresh playtest to compare each choice.
| Choice | What It Changes | When to Pick It |
|---|---|---|
| Fill (Crop), the default | Keeps proportions and fills the viewport, cropping overflow | The picture should cover the view. Check its outer details. |
| Fit (Letterbox) | Keeps proportions and shows the whole image | Every part should stay visible. Expect gutters at differing aspect ratios. |
| Stretch | Fills both viewport dimensions independently | You want the picture stretched. Check shapes for distortion. |
| Actual Size | Centers the image at its authored pixel size | You want its original pixel dimensions in the game viewport. |
| Tile Both | Repeats along both axes | The picture should repeat across the view. |
| Tile Horizontally | Repeats sideways and fills the viewport height | You want horizontal repetition. Check the resulting vertical stretch. |
| Tile Vertically | Repeats vertically and fills the viewport width | You want vertical repetition. Check the resulting horizontal stretch. |
The square picture makes each difference visible. A picture with matching opposite edges repeats without a visible join; check the seams in the actual viewport.
Change the Artwork
Edit the artwork in Pixel Editor. The Sprite Editor guide explains the shared drawing tools, including the image layers you see here.
For a linked file, open Backdrop Art and choose Import/Create in Background Editor Modes.
- Save your revised
four-cells.pngin its export folder. - Choose Reimport Changed from Folder… and select that folder.
- Return to Pixel Editor. Check for the banner The sprite sheet changed outside Pixel Editor.
- Choose Rebuild Layers from Sheet to continue with the revised export. This replaces the existing image layers.
The banner offers a choice between the export and your existing layers. Choose before comparing resize settings or saving.
| Choice | What It Changes | When to Pick It |
|---|---|---|
| Rebuild Layers from Sheet | Replaces the image layers with the imported picture | You want the revised export. Existing layered edits are discarded. |
| Keep My Layers | Writes the existing layers back as the picture | Your Pixel Editor edits are the version to keep. |
Check the chosen picture in every Scene using the Background. To remove its source association, return to Import/Create and choose Remove Link. The current picture remains.
After any replacement, compare the complete picture in Fit with the cropped and repeated versions before keeping a resize choice. Save and reopen before checking a fresh run.
If the Picture Looks Wrong
| Symptom | Where to Look |
|---|---|
| The resource has a picture, but the Scene does not | Check its Screen Backgrounds assignment and the preview Backgrounds toggle. Run that Scene. |
| Outer details disappear | Check whether Fill (Crop) is selected. Fit shows the complete picture. |
| Shapes stretch | Compare Stretch and the single-axis tile choices with Fit. |
| The picture is hidden | Check opacity, editor visibility, and any opaque Backgrounds drawn above it. |
| Repetition shows seams | Inspect the source image’s joined edges. |
Where to Look Next
See Scene Editor for Scene controls. Follow the Scene Management Actions reference for the exact fields used by runtime Background Actions.
For a moving, layered sky, follow Shatterfield’s Sky chapter. It assigns six Backgrounds and controls their sliding speeds through Logic.
Myth Engine Documentation