
Logic Components
Reuse one Logic Component on two Marker placements, then change which placement runs it. The Console shows two messages, then one, then two again.
How the Parts Fit
A Logic Component saves Events, Modes, and their connected Actions; an Object holds an attachment to that resource. Scene placements inherit the attachment and can override its Enabled state. Matching Events run on the live instances.
- You makeReport Ready
Its Create Event prints Marker ready.
attach
You attachMarkerAttach Report Ready once, with Enabled on.
place
You configureTwo PlacementsTurn Second Marker's attachment off; First Marker keeps its default.
run
You countTwo, Then OneFresh playtests print two messages, then one; turn the attachment back on before another fresh playtest restores two.
Your Part
Use a 2D project with an Object named Marker, placed twice in Main with both placements Active in Play Mode. Label them First Marker and Second Marker in Scene Explorer.
The Scene Editor guide covers placement. The Logic Editor guide gives the complete resource and Action-entry procedure. Use its Report Ready handler here, with one Create Event, Mode 1, and one connected Print.
Stop any playtest before editing. Keep exactly two active Markers for this example.
Give the Logic One Job
Report Ready prints the literal Marker ready when its owner is created. Keep Category as General and Type as Log. Its connected sequence is short:
Report Ready
Create → Mode 1
- Print Debugger Message
Message: Marker ready
Category: General
Type: Log
End
Choose a small responsibility for other Logic too. One component can handle movement. Another can handle damage. Give each component the Object Variables it needs.
Attach the Saved Logic
Open Marker and choose Logic in Object Editor Mode, then find Report Ready in Logic Toolbox and click it once. It appears as one row under Attached Logic. Clicking that Toolbox entry again keeps one attachment.
Select the attached row. In Properties, keep Enabled on and Pause Mode as Pausable for this example. These are the Object’s saved attachment settings.
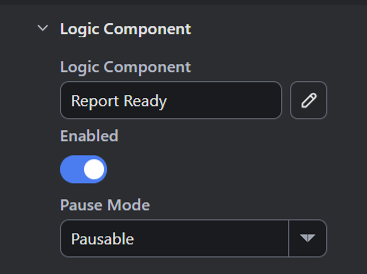
- This attachment refers to the saved Report Ready resource.
- Enabled is on for the Object's attachment.
Save and Check Both Placements
Save the project. Close the editor and reopen that saved file. Check the attachment and the two Scene placements.
Start Debug Play and open Console in the Debugger, then count only rows whose message is Marker ready. You should see two, with Category General and Type Log; the connection note is another kind of row.
Each live Marker runs the same saved Create handler. The Logic resource remains one resource.
Turn Off One Placement’s Logic
Select Stop, open Main, and select Second Marker in Scene Explorer. Under Logic Components, find Report Ready and turn its switch off.
This writes an override for that placement, while First Marker keeps the Object’s enabled attachment. Both Markers remain active Objects in the Scene.
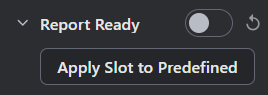
- This switch controls Report Ready on the selected placement.
Save again, close the editor, reopen the file, and start fresh Debug Play to check Console. Only one Marker ready message remains. Turning off this attachment leaves the Marker itself present.
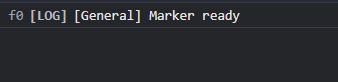
- One Marker ready row remains after the selected attachment is turned off.
Select Stop. Turn Second Marker’s Report Ready switch back on. Save, close, reopen, and start fresh Debug Play once more. Two messages return.
| Saved State | Marker ready Rows After Fresh Play |
|---|---|
| Both placement switches on | 2 |
| Second Marker’s attachment off | 1 |
| Second Marker’s attachment back on | 2 |
The Create Event runs when an instance is created, so use a fresh playtest for each check.
Choose What to Change
| Choice | What It Changes | When to Pick It |
|---|---|---|
| Edit the Logic resource | Changes the shared Events, Modes, and connected Actions. | Fix the behavior for every use, then save and start fresh Play. |
| Object attachment Enabled | Sets the default enabled state inherited by its placements. | Change the reusable default. Inspect existing placement overrides before starting fresh Play. |
| Placement attachment switch | Overrides Enabled for that Scene placement. | Skip or restore its behavior here. Save and restart Play to repeat the creation check. |
For several components, Attached Logic shows their execution order. Within a handler, Actions follow their connections. Moving a block on the canvas changes its position; reconnect it to change the flow.
Put State on Its Object
Logic declares the Variables it requires. Its holder supplies their Per Instance or Shared values. The Variables guide shows separate health values and one common score.
Execution locals belong to the current invocation. A Function’s locals belong to its call. Use Object Variables or declared Project Globals for values that must survive separate invocations.
Repair an Attachment
Back up older projects before conversion. Inspect the Object’s Variables and its Scene overrides, then save and reopen. Test the affected behavior on fresh instances.
The Toolbox can show a problem on an unsuitable Logic resource. Check its named requirements and the Object’s supplied data; clear the search field when a resource seems missing. A Function is called by other Logic; it has no Event-driven attachment here.
Troubleshooting
| Symptom | Check and Next Action |
|---|---|
| No message appears | Open Main, check both Active in Play Mode and the attachment switch, then start fresh Debug Play. |
| Both Markers stop reporting | Check the Object attachment as well as each placement’s override. |
| More than two messages appear | Count active Markers and other Events or connected Print Actions that write the same message. |
| An Action does not run | Check its connection to the active Mode’s sequence. Use the Logic Editor guide to reconnect it. |
| A value disappears between Events | Store it on its Object or in a declared Project Global. Execution locals belong to their invocation. |
Where to Look Next
The Print Debugger Message reference lists its exact fields. Use the Logic Editor guide for original field-entry controls and connected sequences.
In Weighted Maze’s Find Route section, Logic on Maze Rules coordinates several Events and named Modes. Study that larger behavior after checking which Markers run this one.
Myth Engine Documentation