
Display and Rendering
Set a 640 × 360 reference size and a requested 1280 × 720 window separately in Game Settings > Display. Your level can extend beyond either size. Render Scale controls how densely the runtime draws the logical surface into its buffer.
Prerequisites
Stop playtest and save your project first. Use a valid Start Scene with recognizable art and a screen-space UI element for comparing framing. Keep a saved checkpoint before changing reference height or Project Type.
Select Game Settings in the Resource Tree. Open Display.
Set the Launch Window
- Expand Window and set Window Mode to Windowed before editing the initial dimensions.
- Under Initial Window Size, set X to
1280and Y to720. - Leave Resizable on.
- Enter an identifying Title, save the project, and start a fresh playtest of your chosen Start Scene.
- Inspect the window, then resize it.
The game scales its presentation to the resized window while Object coordinates remain in the same logical system.
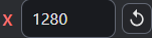
Initial Window Size requests a desktop launch size, with X controlling the width.
- Enter 1280 for the requested window width.
| Window Control | Default and Choices |
|---|---|
| Title | My Game. |
| Window Mode | Windowed. Choose Borderless or Fullscreen for other desktop presentation modes. |
| Initial Window Size, X | Blank means Automatic. Enter 320–8192 pixels. |
| Initial Window Size, Y | Blank means Automatic. Enter 240–8192 pixels. |
| Resizable | On. Available in Windowed mode. |
Initial dimensions and Resizable appear together only when Window Mode is Windowed, since other modes use different presentation rules. Test the desktop you will ship for. Initial Window Size requests a launch size; inspect its actual result.
A published game fills its host and cannot resize the containing browser window. Use Set Full Screen to change presentation during play; Window Mode still chooses a desktop game’s startup state.
Set Reference Resolution
- Stop playtest and reopen Game Settings > Display.
- Expand Reference Resolution.
- Under Reference Size, set X to
640and Y to360. - Check Preview for
640 × 360and a16:9aspect ratio. - Inspect the Scene’s Game View, its Cameras and Views, and your screen-space UI.
- Save and reopen the project, then compare the layout in fresh playtests at different window sizes.
The reference size supplies the game’s logical screen dimensions. Check the Start Scene’s enabled Views too. Their screen rectangles can extend the runtime surface beyond the requested size. For this comparison, keep every enabled screen rectangle inside 640 × 360. The world can extend farther.
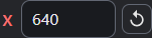
Reference Size’s X value sets the requested logical width independently from the desktop window.
- Here, X is 640.
Blank reference fields use the compatibility dimensions, normally 1024 × 768 in a new project. Enter positive values for an explicit size. Changing reference height rebases the 2D origin. Inspect Object positions, Camera framing and screen-space UI again after that change. Save and reopen before exporting.
Use Cameras and Views to choose the visible world area: Camera sizes use meters, while View screen rectangles use logical pixels. For a complete layout example, read Weighted Maze’s map and sidebar.
Choose Filtering and Rendering Quality
Set Texture Filtering to Pixel-Art (Crisp), Render Scale to 1× Reference Resolution, and Anti Aliasing to Off. Run the same Scene at one Camera position. Stop playtest and return to Game Settings > Display before changing Render Scale to 2× Reference Resolution. Start a fresh playtest for the comparison. For a 640 × 360 surface, this requests a 1280 × 720 buffer while keeping logical coordinates unchanged; runtime size limits can cap the buffer.
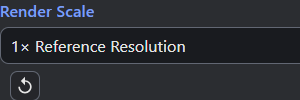
Render Scale changes the buffer’s density.
- 1× Reference Resolution uses the logical surface as its buffer size before runtime limits.
| Rendering Control | Behavior and Default |
|---|---|
| Project Type | 2D by default. 3D / HD-2D exposes 3D authoring tools; existing 2D Scenes retain their type. |
| Texture Filtering | Pixel-Art (Crisp) by default. Smooth Textures interpolates sampled texture pixels. |
| Render Scale | Match Window (Recommended) by default. Fixed 1×, 1.5× and 2× choices set standalone backing density. |
| Anti Aliasing | Off by default. MSAA (Hardware), FXAA (Fast) and FXAA High (Quality) provide edge smoothing. |
| Graphics API | WebGPU by default, with fallback to WebGL 2. WebGL 2 Only selects the compatibility backend. |
| Performance Profiler | Off by default. Playtest Only (F3), Enabled (F3) and Always Visible set availability and startup visibility. |
| Sprite Batching | Automatic (Batch When Safe) by default. Off (One Mesh per Sprite) disables batching. |
Filtering and anti-aliasing affect different stages. Smooth Textures leaves explicitly Off anti-aliasing unchanged. Older projects without an anti-aliasing setting can derive MSAA from smooth filtering. Check Anti Aliasing after changing filtering.
Compare stationary edges and slow movement when trying Smooth Textures or anti-aliasing. Use the profiler for frame costs. MSAA availability depends on the device, so retest the exported game on your target hardware.
Inspect Performance
Set Performance Profiler to Playtest Only (F3) and start a fresh playtest. Click the game and press F3 to open the panel, which shows FPS, frame time and draw calls. Press F3 again to cycle compact and hidden views. Keep the Scene and Camera position fixed while comparing one quality change.
Playtest Only enables F3 during playtests, while Enabled (F3) also enables it in exported games. Always Visible starts open. Export and test the mode the player will receive.
Sprite Batching combines compatible Sprites, while mesh-dependent features can require separate meshes. Compare Automatic and Off using draw calls and the visible Scene. Measure frame time too. Keep gameplay and asset loading consistent.
Distinguish Page and Scene Backgrounds
Page Background (Outside the Game) fills the web page around the canvas. Its Color defaults to #4B64AF. Choose Image… adds a page image and reveals Fit.
| Fit | Result |
|---|---|
| Cover | Fill the area. Cropping may hide image edges. |
| Contain | Fit the whole image, leaving spare space when needed. |
| Center | Center the image at its original size. |
| Tile | Repeat the image. |
Remove Page Background Image clears the image and restores Cover. Save and reopen after choosing an image, then check that the image and Fit setting return correctly. Scene art uses Scene Background settings. Check the page at different screen sizes.
3D Quality Controls
For a 3D project, select Project Type: 3D / HD-2D to expose Display sections for additional rendering controls. Occlusion culling and level of detail default to Off; GPU instancing defaults to On. Use a representative 3D Scene when changing them. See 3D Worlds for introductory setup.
Troubleshooting
| Symptom | Check |
|---|---|
| Window grows but layout stays the same | Compare window pixels with reference size, Cameras, Views and UI anchors. |
| Initial dimensions disappear | Choose Windowed to edit Initial Window Size and Resizable. |
| Logical surface exceeds the reference size | Inspect the Start Scene’s enabled View rectangles. |
| Pixel art looks blurred | Check filtering, anti-aliasing, fractional scaling and the actual display size. |
| Quality increases reduce frame rate | Compare one setting at a time in the same Scene and Camera position. |
| F3 works only in playtest | Choose Enabled (F3) for the exported game. |
| Background art appears outside the game | Check Page Background versus the Scene’s Background assignment. |
| An older project renders differently | Inspect reference dimensions, filtering, anti-aliasing and Graphics API before changing gameplay data. |
Myth Engine Documentation