
Choose a Publishing Target
Choose what your players will open, then publish the matching output. Web exports run in a browser; desktop and mobile exports give you a source project to build.
How Publishing Fits Together
Your saved .mythproj keeps the game you edit. Publish reads its resources and current output settings, then writes a separate release.
Test it outside the editor.
- Saved project
My Game starts in Main.
choose
TargetChoose Web files or a native source project.
Publish
Player testOpen Web output, or build and run the application.
- ZIP archive
A ZIP carries release files. Native compilation follows separately.
Your Part Before Publishing
Use an existing playable project and an edition that permits publishing. Publishing requires a valid Full Edition entitlement; Playtest and Demo keep publishing unavailable. See Licensing Terms.
Save your project. In Game Settings > General > Startup, check Start Scene and run the game from a fresh start. Check the title and required art. Review any icon or splash image you’ve chosen, along with App ID and Version for packaged desktop and mobile targets.
App ID and Version label packaged builds. The Web target hides those fields, including when PWA Files is On. Version names the packaged game’s release. Keep it separate from the Myth editor version.
Publish My Game for a Website
This example uses a game named My Game, starting in Main. You’re sending it to your website.
- Open Game Settings in the Resource Tree. Select Publish.
- Choose Web, then set Format to Web Folder (Offline). Writing a folder requires the Myth desktop app.
- Set Folder Assets to Separate Files in Assets/ if you want ordinary imported assets in separate files.
- Save the project. Click the toolbar Publish button and choose a dedicated release folder outside your source project.
- Serve the whole output folder. After its startup screen clears, check Main and use the game’s controls.
- Reload the page and repeat the first interaction. After upload, repeat those checks at the website’s public address.
Follow Publish a Web Game for the local server and output options. Changed settings affect the next Publish. Publish again and reopen the new output to test them; earlier release files stay in place.
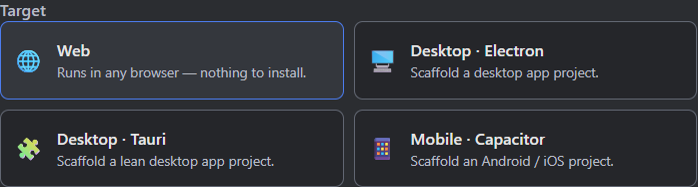
- Web writes browser output. Its Format field chooses Single HTML, Web Folder or CDN HTML.
- Electron creates a desktop source project.
- Tauri uses its own desktop toolchain.
- Capacitor creates a mobile source project for Android or iOS setup.
Choose From the Delivery Requirement
| You need | Choose | What you receive and do next |
|---|---|---|
| One portable browser file | Web: Single HTML (Offline) | One HTML file embeds the engine, game and ordinary imported assets. Test the file and any authored external dependencies. |
| Files for a game website | Web: Web Folder (Offline) | index.html, local babylon.min.js and supporting files. Serve and upload the entire folder. |
| A browser file using an online engine | Web: CDN HTML (Online) | One HTML file loads the pinned Babylon dependency from jsDelivr. Test with network access. |
| A web app with generated PWA files | Web Folder with PWA Files On | A manifest, service worker and related assets join the folder. Test HTTPS delivery and the offline behavior you intend to offer. |
| An Electron desktop application | Desktop · Electron | A named source-project folder containing the Web payload under www/. Follow its generated README and build with the Electron toolchain. |
| A Tauri desktop application | Desktop · Tauri | A named source-project folder containing www/ and Tauri configuration. Follow its README and platform requirements. |
| An Android or iOS application | Mobile · Capacitor | A named source-project folder containing www/ and Capacitor configuration. Set up the platforms and build with their toolchains. |
Desktop and mobile output still needs dependencies, compilation, packaging and any required signing. Write Project ZIP archives the source project. Build the application afterward, following desktop and mobile publishing for the next stage.
Verify the Handoff
Keep the saved source checkpoint, chosen target, output settings and release destination together in your release notes. For packaged targets, include the game version. Keep a previous working release until its replacement passes testing.
For My Game, confirm that Main starts and its first input works outside the editor. Then test the rest of the game: required art, audio after player interaction, Scene transitions, completion and replay where used. Native source projects need the same checks in the built application on each supported platform.
When publishing fails, use Publishing Problems to identify the stage: validation, destination writing, hosting or native build. Before reusing a destination, read publishing again.
Where to Look Next
The Web output choices list the visible fields and when each applies. Use the resource reference to look up the assets your game includes.
For a published example of art and UI working together, read Weighted Maze: Show Terrain Picture. Its terrain pictures and buttons are the sort of visible state to compare when testing an exported game.
Myth Engine Documentation