
Cameras and Views
Frame your Scene with a Camera and show its image through a View. Then choose one moving World Marker for the Camera to follow.
How the Parts Fit
Your Scene holds the placed Objects. A Camera selects the visible world area. A View binds that Camera to a rectangle on the game screen.
- Place the Objects
Reference Scene holds a moving World Marker and another still placement of that same Object.
Camera
Frame the WorldMain Camera shows 20 by 11.25 metres.
View
Choose the RectangleMain View places the Camera image in the 640 by 360 reference-screen rectangle.
new run
Run the GameThe game shows Main View. Its Camera uses the chosen Follow settings.
- Choose a Follow Target
Follow one placed World Marker; adjust its margins, axes and smoothing.
Start With a Moving Marker
Use a saved 2D project with a World Marker that already moves through your game’s controls. Keep another World Marker placement still. Their different movement will show which occurrence the Camera tracks.
Run that game first. Confirm your controls move the intended placement, then stop the playtest. For those connections, see Commands and Events and Actions.
The example calls its Scene Reference Scene. Its world scale is 32 pixels per metre, and its reference screen is 640 by 360. Check World Scale and Reference Resolution before setting the Camera.
Frame Main Camera
Open Reference Scene in Object Mode, choose Select, then press Escape to clear any selected Object or Camera before setting the framing. Expand Cameras and Views, then select Main Camera in Scene Explorer.
Under Scene Hierarchy, clear Parent with (None) and Follow with (Nothing) for this first framing check.
In Visible World Area, use these values.
| Group | X | Y |
|---|---|---|
| Position | 10 |
5.625 |
| Visible Size | 20 |
11.25 |
Keep Rotation at 0. Position sets the Camera’s center; its positive authored Y points upward. At this density, 20 metres corresponds to 640 game pixels.
Choose Look Through Camera to inspect the Camera image, then choose Exit Camera View to return.
Frame Camera fits the Camera frame into your working editor preview. The authored world size stays fixed. Camera View Mode keeps the selected Camera area lit.
Place the Image on Screen
Return to Scene-wide Properties and select Main View under Cameras and Views. Keep it enabled and bind Main Camera. Set its On-screen area to these reference-pixel values:
| Field | Full Screen | Smaller Rectangle |
|---|---|---|
| Width | 640 |
320 |
| Height | 360 |
180 |
| Left | 0 |
40 |
| Bottom | 0 |
30 |
Enter Width and Height before Left and Bottom. Bottom counts upward from the reference screen’s bottom edge. It stays fixed when you change Height.
Try the smaller rectangle. Main View now places the same Camera image in a smaller screen area. Change Height to 120; Bottom should remain 30. Restore the full-screen values before the following example.
These screen dimensions use reference pixels; the Camera’s Visible Size still uses metres. Run a fresh playtest after View changes to see the new rectangle.
Follow the Moving Placement
Select Main Camera again. Under Scene Hierarchy, choose World Marker Placement #4 in Follow, the moving World Marker in this example. Match your chosen occurrence’s placement name and row number with Scene Explorer.
Choosing Follow preserves the Camera’s current center through offsets. Under Visible World Area, set Offset X and Y to 0 for a centered start. Parent should show (None).
Under Follow, set both Follow Margin values to 0. Keep Follow Horizontally and Follow Vertically on. Switch Smooth Follow off.
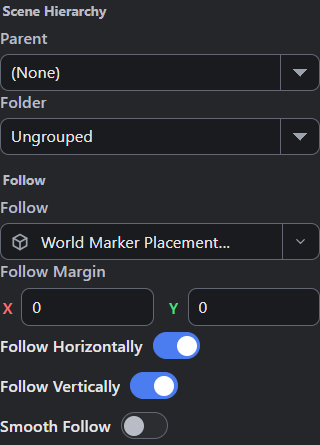
Save the project, close it fully, then open the saved project again and check the Follow choice and offsets. Start a new playtest and move the chosen World Marker; the Camera should track that occurrence while the other placement keeps its world position.
Stop the playtest, turn Smooth Follow on, and run again to compare the Camera’s response to the same movement. Restore Smooth Follow off for the immediate baseline.
Choose How the Camera Behaves
| Choice | What Changes | When to Pick It |
|---|---|---|
| Follow | Tracks one chosen placement with offsets, margins and smoothing. | Keep a moving character in view. |
| Parent | Attaches the Camera to a particular placement. | Make it ride with that Object. |
| Smooth Follow | Moves the Camera toward its target gradually. | Soften the tracking response. |
| Follow Horizontally or Vertically off | Holds that Camera axis during following. | Keep one axis fixed. |
| Follow Margin | Changes the border region that starts tracking. | Let the target move within the frame first. |
| Match View 1:1 | Sizes the Camera from its selected bound View, or first bound View. | Match game pixels to reference-screen pixels at the current density. |
| Match Game Screen Aspect | Constrains Camera resizing to the reference screen’s proportions. | Keep that screen shape while resizing. |
Change these authoring controls while stopped, then start a new playtest. Follow and Parent are separate choices. Choosing Follow clears Parent. To stop following, choose (Nothing) in Follow; the Camera keeps its current authored center.
Check the Result
Check Follow when tracking chooses the wrong copy. If the target sits off-center, check offsets, margins and enabled axes. A parented Camera uses its attachment offset; choose Follow when you want the follow controls.
If an Object disappears during play, check View enabled state, Camera binding and visible world area. Also check that Object’s play visibility and active Scene. For additional regions, create another View and inspect the Camera it binds.
This guide uses the 2D Scene Editor. The Camera component reference covers exact properties and 3D context. Use Camera Actions for runtime changes.
For a working project, see Weighted Maze: Set Up. It connects world scale, Camera framing and the View’s reference screen.
Myth Engine Documentation