
Object Editor
Build Marker with a Sprite sized 2 by 2 meters. Its Scene placements can share that definition.
How the Parts Fit
Marker Art is a Sprite resource holding the imported picture that your Object will use. A Sprite component inside Marker chooses that resource and its local geometry.
The Scene stores placements with their own positions; each occurrence inherits Marker’s component settings until you override them.
- Marker Art
Marker Art holds the imported 64 by 64 pixel picture, which the Object uses through its Sprite component.
choose the Sprite
MarkerIts Sprite component uses Marker Art at 2 by 2 meters.
place the Object
Main placementsPlace Marker twice in Main, giving each occurrence a position while both inherit the component settings.
- Choose the editing scope
Edit Marker for shared defaults, or one Scene placement for an override.
This example has one Sprite. Continue in the Scene Editor to place it twice and reset a selected override.
Prerequisites
Open a project and stop its playtest. Import a Sprite resource named Marker Art before creating the Object.
Use the original four-colour example image for the pictured result. It measures 64 by 64 pixels.

Import an Image covers the Sprite resource setup. Your own image works too; use the same resource name when following the remaining Object steps.
Create a Reusable Object
- Click Add below Resources to open Add Resource.
- Search for
Object, then choose Add Object. - In Create Object, enter
Markerin Name so its definition has a distinct Resource Tree entry. - Select 2D Object, then click Create to open its editor.
Marker appears under Objects and Logic > Objects. Double-click that Resource Tree entry whenever you need to reopen its definition.
The Sprite resource remains separate. Creating the Object gives you the composition that will use that picture.
Add a Sprite Component
- Set Object Editor Mode to Components.
- Expand Rendering in Component Toolbox, where Sprite is listed, then choose that component for this Object.
- In Add Sprite Component, choose
Marker Artin Sprite. - Click Add Sprite to attach the component.
- With this single Sprite attached, select Sprites under Attached Components to show its settings on the left.
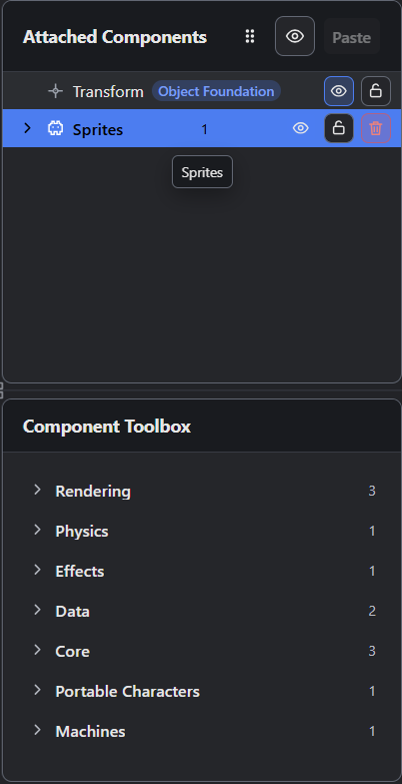
- Select Sprites here to inspect the assigned image, local geometry, and appearance settings in Properties.
- Rendering in Component Toolbox contains the Sprite component you can add.
The Object preview now shows the four-colour picture. Properties edits the selected component, so check the selection before changing its fields.
Adjust Local Placement
In the Sprite’s Transform > Local Transform, choose Independent for Positioning. This example sets the component’s geometry directly.
Set Position X and Y to 0. For Size, enter X 2 and Y 2, committing each field with Tab.
Both Size values are meters in this world-space example. Default Visual Size shows the authored 2 by 2 meters alongside the Sprite frame’s source size of 64 by 64 pixels.
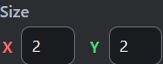
Local Position offsets the art within Marker while keeping the reusable Object’s own origin in place. Position the whole placement through the Scene’s World Position fields when arranging a level.
Save the project now. Close the editor, reopen that saved project, then select Marker and its Sprite again.
Check that Sprite still names Marker Art and both Size fields still read 2.
Check Reuse in a Scene
The saved definition is ready for placement. Follow the Scene Editor’s Place Two Markers steps to use the saved definition in Main.
Two ordinary placements inherit this Sprite’s size. A selected placement can keep an override while the other still inherits.
The Scene guide changes one Sprite to width 3, then resets it to the inherited 2.
Choose the Workspace and Scope
| Choice | What It Changes | When to Pick It |
|---|---|---|
| Components | Attached Components, Component Toolbox, and the selected component’s Properties. | Add Sprite art or adjust its local geometry. Save, then start fresh Play to test edits. |
| Logic | Attached Logic and Logic Toolbox handle behavior assignments. | Attach compatible Logic. Save the project and restart Play before checking the new sequence. |
| Child Objects | Object Hierarchy and Object Library compose other Objects inside this definition. | Build a reusable composition from existing Objects. Check its placement in a fresh run. |
| Independent Positioning | Sets this Sprite’s local geometry directly. | Use the example’s explicit Position and Size values. Commit the fields before saving. |
| A retained Positioning relationship | Keeps a relationship with another component’s bounds. | Align content that should follow those bounds. Inspect the relationship before dragging or resizing. |
| Edit the reusable Object | Changes defaults for placements that inherit the setting. | Update every inheriting Marker. Save and restart Play to check the result. |
Editing Target identifies what the preview handles will change. Check that target before dragging. Eye and lock controls in Attached Components affect preview visibility and selection. Test runtime visibility through the component’s own rendering settings.
Check Components Separately
Attach and Configure Logic
Use the Logic Editor to author Events and Actions before attaching the behavior. Select Logic in Object Editor Mode. Choose an attachment under Attached Logic. Per Instance Variables and Shared Variables show its requirements when present. Logic sets their names and types.
The Object owns their values. Return to Components when you want the Sprite’s Properties.
Configure Collision Separately
Collision comes from a Collider component. Check its shape, bounds, and retained relationships when matching it to the art. Test contact in Play before relying on that shape. For movement and ground setup in a platformer, follow Platformer Parts after checking the Collider reference.
Troubleshooting
| Symptom | Check |
|---|---|
| The picture exists only in Resources. | Attach a Sprite component to Marker, then choose Marker Art. |
| Dragging changes the wrong geometry. | Select the intended component and check Editing Target. |
| An offset follows another component. | Inspect Positioning and the bounds supplying that retained relationship. |
| Art appears in the Object preview but not in Play. | Check Scene placement, runtime visibility, and camera framing. |
| One placement keeps a different size. | Inspect its Scene override before changing the definition again. |
Where to Look Next
The Sprite Component Reference lists exact Sprite fields, and the Collider Reference covers collision settings. Objects and Components explains component identities and inheritance.
For a published example, read The Title Over the Map. Weighted Maze builds reusable Text Objects there, then places them through the same definition-to-placement relationship.
Myth Engine Documentation