
Install and Open Myth Engine
Create a blank project to check your editor and save location. Then reopen it and start a playtest.
Get the Editor
Open Get Myth Engine for Windows downloads and edition details, then follow your chosen distribution’s download or installation instructions. Open Myth Engine.
| Edition | Project Work |
|---|---|
| Full | Create, save, and playtest projects, with publishing available. |
| Steam Playtest or itch.io Demo | Create, save, and playtest locally. Publishing is unavailable. |
Check your installed edition if Publish is unavailable. The distribution page explains the current terms.
Create a Project
- Choose New Project on the welcome screen, or use File > New Project… when the editor is already open.
- Select Blank 2D or Blank 3D. Each starts with a Scene and no starter gameplay.
- Enter a Project Name, such as
First 2D Project, which Myth uses for both the folder and document. - Beside Location, choose Browse… and select an existing parent folder where Myth can create your project’s own folder.
- Read Will Create to check the destination and filenames. Use a project name whose folder does not already exist there.
- Choose Create Project. Myth saves the initial document and opens its Scene.
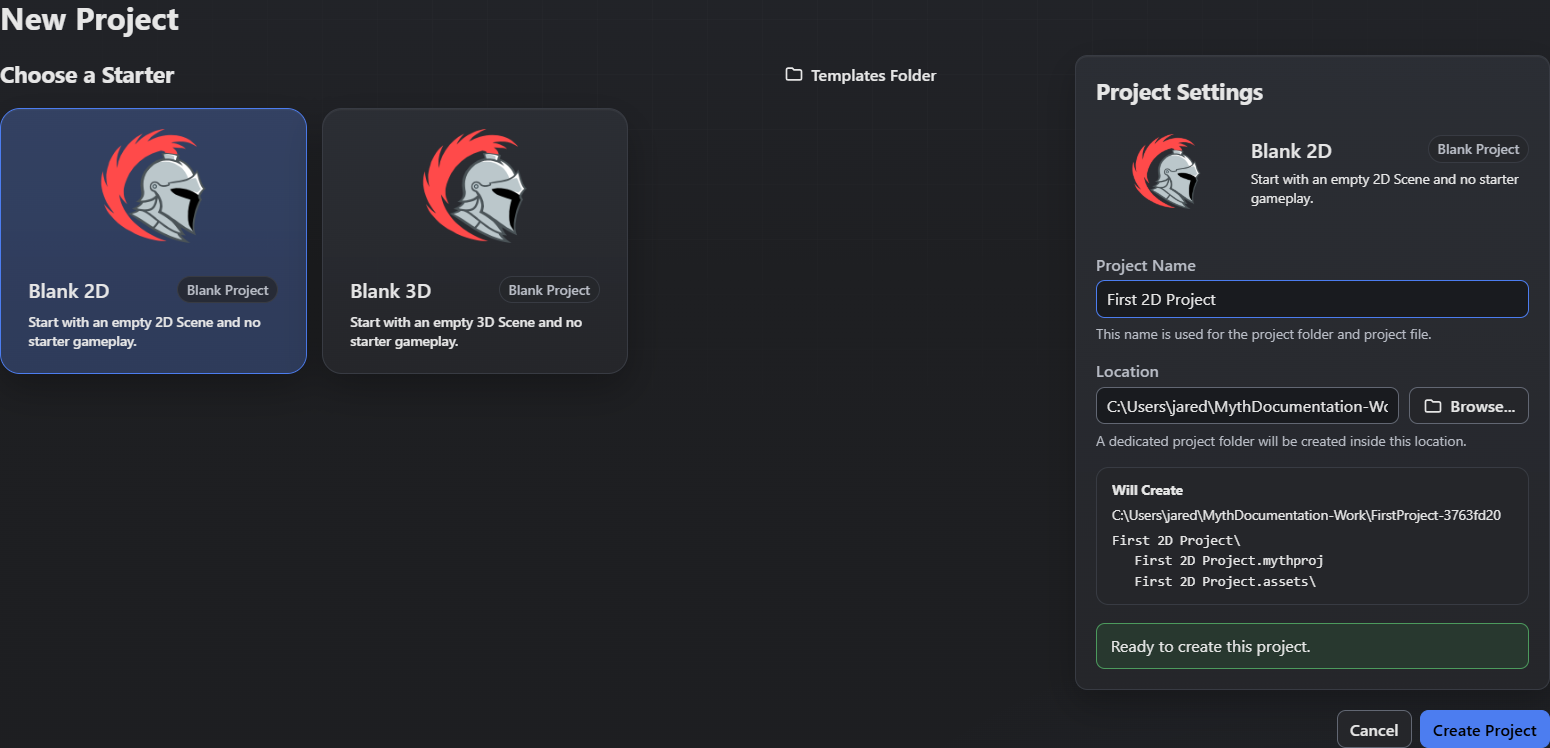
- Select Blank 2D or Blank 3D.
- Project Name sets the new folder and document name.
- Browse changes Location.
- Will Create lists the parent folder and the project folder that will be created inside it.
- Create Project saves the initial document.
For this example, the new folder is First 2D Project. Its document is First 2D Project.mythproj. The initial Scene is already saved; use Ctrl+S as you continue working.
Other starter cards depend on the templates installed in your Templates folder. Templates Folder opens that location. Blank starters give you a consistent starting point.
Keep the Folder Together
A .mythproj document stores the settings and resources that make up your saved project. External media uses a matching .assets folder beside it. For example, keep Forest.assets beside Forest.mythproj when your project uses external media.
The chooser previews that companion folder in Will Create. Myth removes it when it contains no managed media, so a new blank project may contain only its document.
Keep the entire project folder when copying, moving, or backing up work. Projects and Resources explains its contents.
Reopen and Run
- Check the project name in the window title. Expand Scenes in the Resource Tree to find the initial Scene, then press Ctrl+S and wait for Saved.
- Choose File > Open Project… and open the saved
.mythprojfrom its exact folder. Check the name and Scene again. - Use Play to start a fresh run of the reopened project; blank starters have no gameplay yet.
- Use Stop Playtest to close the game and return to editing.
The reopened document should retain its project name and initial Scene. Both blank starters should run. Check imported media again after you add and save it.
If Creation Stops
| What You See | What to Check |
|---|---|
| Create Project is disabled | Read the message below Will Create. Supply a folder-safe name of up to 120 characters. |
| The named folder already exists | Choose another project name or parent folder. Existing content stays in place. |
| A filesystem error appears | Check the selected parent folder and its write access. Read the exact error before retrying. |
| A reopened project differs or reports missing media | Confirm its document path. Follow Project Files and Missing Assets before replacing files or discarding recovery. |
Continue with Workspace Overview to find the editor panels. For a complete 2D example, Weighted Maze setup starts from a blank project.
Myth Engine Documentation