
Scene Editor
Place two Markers from one Object, then resize one Sprite locally. Reset its override to use the shared size again.
How the Parts Fit
Marker is the reusable Object. Main stores two placements that refer to it.
A Sprite override changes the selected placement’s component settings while the reusable definition and its sibling stay unchanged. Reset Component Overrides removes that Sprite patch and restores inherited values.
- Marker defaults
The Sprite component on Marker supplies the shared 2 by 2 meter size inherited by both placements in Main.
place Marker twice
Two placementsFirst Marker and Second Marker both inherit that size.
edit one locally
First Marker: 3Change only the Sprite width on First Marker to 3, while Second Marker retains its inherited width of 2.
- Reset Component Overrides
Remove this Sprite patch. Width returns to its inherited 2.
A Predefined Object placement references the reusable definition. A Scene-local Object keeps its own composition inside Main and is separate from the reusable Marker definition.
Both appear in Scene Explorer. Choose the editing scope before changing their components.
Prerequisites
- Open a project and stop its playtest before editing.
- Prepare a 2D Object named
Markerwith one independent Sprite sized2by2meters. - Save a checkpoint before changing reusable defaults or several placements.
The Object Editor guide builds that exact Marker using the four-colour example image. This example uses world-space placements in a 2D Scene.
Create or Open Main
If Main already exists as a 2D Scene, open it from the Resource Tree. Otherwise, create it through the current resource dialog:
- Click Add below Resources, then search for
Scene. - Choose Add Scene to open Create Scene.
- Enter
Mainin Name and choose 2D for Dimension. - Click Create. Keep Object Mode selected in the Scene Editor.
The new Scene opens as its own editor document, ready for the placements you’ll add in this example. You can return to it by double-clicking Main under Scenes.
Place a Predefined Object
- Choose Place, then select
Markerfrom the content list so the next preview clicks place that definition. - Click two separate positions in the preview to create two placements.
- Choose Select afterward, so later clicks select content.
- Select the first occurrence in Scene Explorer and set its Label to
First Marker. - Under Transform > World Position, enter X
10and Y6, committing each field with Tab. - Select the second occurrence. Label it
Second Marker, then set World Position to X14, Y6.
Scene Explorer now has two Markers, while Resources still has one reusable definition. Each label helps you select the intended placement. Changing First Marker’s World Position moves that occurrence alone, so Second Marker’s saved position should still match its fields. The project’s coordinate convention determines the vertical direction.
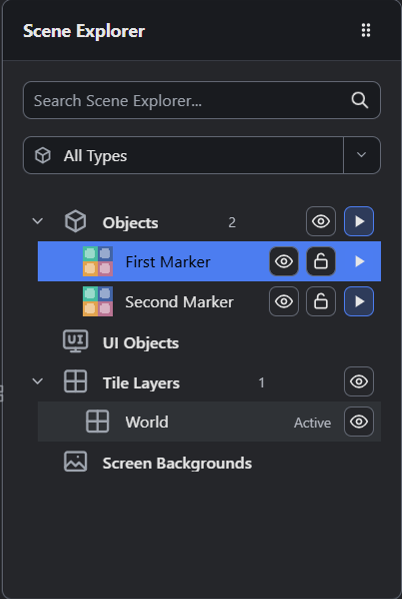
- First Marker is selected for the next edit.
- Second Marker is another placement of the same definition, with its own saved position and label.
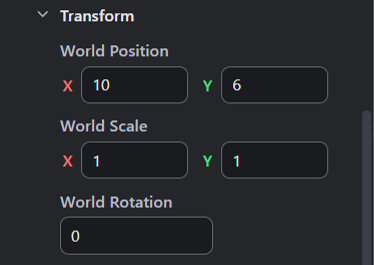
- World Position changes the selected placement, with X 10 and Y 6 here.
Confirm the selected Scene Layer when placing content in a composed level. Scenes and Instances explains the stored relationships.
Inspect and Reset Overrides
- Select
First Markerin Scene Explorer, then choose Edit Object Locally. - Select its Sprite component. Change Size X from
2to3, then press Tab. - Check the Sprite’s Override badge and the Reset Component Overrides button.
- Compare the selected width with Second Marker and the reusable definition: those still use
2. - Click Reset Component Overrides. First Marker’s visible Size X returns to
2. - Choose Back to Scene to finish component editing.
The local edit stores a patch for First Marker’s Sprite; Marker stays reusable and the second occurrence keeps inheriting.
Reset removes that Sprite patch, so the placement inherits its component settings again.

Check Framing and Playtest
Save the project and keep Main open. Game View helps inspect framing; start Debug Play to check the running Scene.
Expect two four-colour Markers at the authored positions, with their original Sprite sizes after the reset. Click Stop when you finish checking the result.

Close the editor and open the saved project in a fresh session. Check the two placement positions and inherited Sprite sizes again. After later edits, save and start a fresh run so you can check the newly authored settings on live instances.
Choose the published entry Scene separately. General Settings lists Start Scene.
Choose the Editing Scope
| Choice | What It Changes | When to Pick It |
|---|---|---|
| World Position | Moves the selected placement in the Scene. | Arrange the level. Commit the fields, save, then start fresh Play. |
| Edit Object | Opens the reusable definition and changes inherited defaults. | Update every inheriting Marker. Save and restart Play to check the new defaults. |
| Edit Object Locally | Changes components through a selected-placement override. | Make one Marker different. Save, then check that occurrence in a fresh run. |
| Reset Component Overrides | Removes the selected component’s local patch. | Restore inheritance. Inspect the fields immediately, then save and test again. |
| New Scene Object | Creates composition owned by this Scene. | Add private Scene content. Save the Scene and start fresh Play to check it. |
Create a Scene-Local Object
Choose Place and a preset under New Scene Object, such as Empty Object, then click the preview. Choose Select afterward and find the new entry in Scene Explorer.
That composition belongs to Main. It adds a Scene occurrence without requiring another reusable Object in Resources.
Use the existing Marker definition for repeated content whose ordinary placements should continue sharing the same component defaults.
Separate Runtime State From Editor Visibility
| Control | What It Changes | When to Pick It |
|---|---|---|
| Active in Play Mode | Sets starting gameplay and visual participation; an inactive runtime record remains. | Disable starting content. Save, then inspect a fresh run’s active state. |
| Visible at Game Start | Sets starting visual visibility separately from activity. | Keep active content hidden initially. Check the first frame before Logic changes it. |
| Shown in Scene Editor | Shows or hides the placement in the authoring preview. | Clear the editing view. The preview changes immediately. |
| Selectable in Scene Editor | Enables or locks preview selection. | Protect content while editing. Scene Explorer can still select the placement. |
Hidden visuals can still have active Logic or collision. Check activity and visibility separately when diagnosing missing content. Editor eye and lock controls help authoring; test the runtime settings in Play.
Inspect Logic Components
Select the intended placement, then expand Logic Components in Properties. Check each attachment’s enable switch; a disabled attachment leaves that behavior out of gameplay.
Per Instance Variables appear when the Object declares them. Values can differ between placements. Configure Shared Variables on the reusable Object. Save the project, then start a fresh run to check changed starting values.
Start a fresh Debug Play run and inspect the actual Event result. Events and Actions gives a connected diagnostic example.
Troubleshooting
| Symptom | Check |
|---|---|
| More Markers appear after clicking. | Switch from Place to Select, then remove unintended occurrences. |
| The intended placement cannot be clicked. | Select it in Scene Explorer; inspect editor visibility and selection locks. |
| One placement ignores a definition change. | Inspect its component override and local composition before changing defaults again. |
| Several placements change together. | Check whether Edit Object or Apply targeted the reusable definition. |
| An Object appears only in the editor. | Check starting activity, visibility, camera framing, and its first Events. |
| Logic reports a missing requirement. | Check required Components and Variables on its Object, then resolve the diagnostic before Play. |
Where to Look Next
The Transform Component Reference describes exact transform fields, and Cameras and Views covers world dimensions and screen framing. Use Scene Transitions and Lifecycle for navigation and restart behavior.
For a published placement example, read The Title Over the Map. Weighted Maze places reusable Screen UI Objects there, entering their pixel positions through Screen Offset. Tileset Editor and Platformer Rooms cover other layout tools.
Myth Engine Documentation