
Logic Editor
Connect a Print Action to your Marker’s Create Event to write Marker ready in the Debugger’s Console. The message marks its first moment in play. You can see when its Logic runs before adding movement or input.
A Logic Component owns Events and attaches to an Object. A Function runs when another sequence calls it. Choose the resource type when creating it; that choice stays with the resource.
How the Parts Fit
The saved Logic contains the Event and its connected Actions; the Object holds an enabled attachment to that Logic. A Scene placement creates a live instance when you play.
The live instance receives Create once, and its attached Logic follows the sequence to print the message. Keeping a Logic resource in Resources gives you something to attach; the enabled attachment makes it participate.
- You authorReport Ready
Report Ready holds the Create Event and the Print Action that you connect to it.
attach
You attachMarker ObjectMarker has one enabled attachment to Report Ready.
place
You placeMain SceneMain stores one active Marker placement that will be created when you start Play.
Debug Play
You testMarker readyCreate runs once and sends Marker ready to Console.
Your Part
Start with an open 2D project, an Object named Marker, and a Scene named Main. Place one active Marker in Main. The Scene Editor guide shows how to place an existing Object.
Stop any running playtest. You’ll create the Logic, connect its Action, and attach it to Marker so Main can run that behavior on each new instance. Save and reopen it before Play. Art and a Collider are optional; the diagnostic needs an active instance and an enabled Logic attachment.
Workspace Controls
The canvas shows Events, Modes, Actions, and their connections. Search the Action List on the right for the Action or Function you want to add.
Click an Action’s field to edit its value. Logic Settings opens the Logic’s own card, where you can check its dimension and attachment requirements. Other canvas cards hold Globals, required Variables, and component requirements.
Use Fit to frame the content and Arrange to tidy its layout. Middle-drag pans the canvas. A nearby block runs only after you connect it into the sequence.
Create the Logic Component
- Select Add below Resources.
- In Add Resource, search for
Logic Component, then select Add Logic Component. - In Create Logic Component, set Name to
Report Readyso you can find this resource when attaching Logic. - Keep Starter set to Empty Logic Component, then select Create.
The new resource appears under Objects and Logic > Logic > Logic Components. Its editor has no Events yet. A Function uses a separate resource type and starts with a callable implementation.
Other Starters make editable Logic in your project. Choose one when you want its existing behavior as a starting point. This example uses the empty choice so you can follow every connection.
Add the Event and Action
- Select Add Event in the workflow toolbar.
- Filter the picker for
Create, select Create, then select OK. - Keep the new Mode 1. Click that Mode block to select its sequence.
- Search the Action List for
Print Debugger Message. Click the matching Action. - If it is unattached, right-click the new block and select Connect to Sequence.
- Replace Message with
Marker ready, then press Ctrl+Enter to finish editing the field. - Keep Category as
Generaland Type as Log.
Check the path from Create into Mode 1, then through Print Debugger Message to End. The message belongs to the Print Action. Moving that block around changes the layout; its connections keep the execution order.
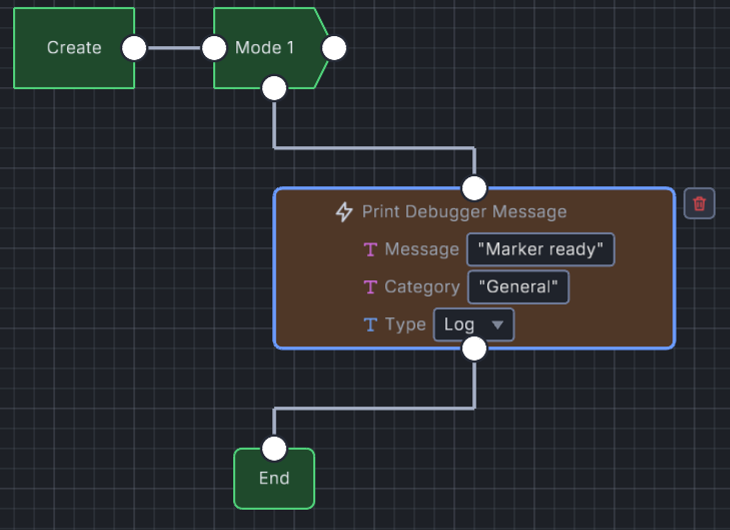
- Create leads into Mode 1, the sequence used here.
- Message is Marker ready, Category is General, and Type is Log.
- The connected path continues to End.
Attach the Logic to an Object
- Open
Markerfrom Resources. - Set Object Editor Mode, above the workspace, to Logic.
- In Logic Toolbox, find
Report Readyand click it once to add the attachment to Marker. - Confirm one
Report Readyrow in Attached Logic. - Select that row and keep Enabled on in Properties.
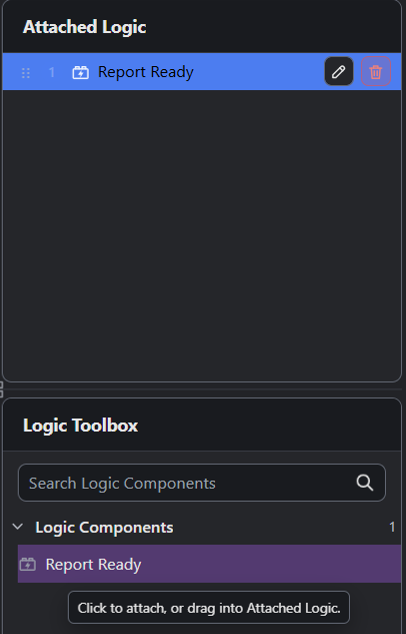
- The selected Report Ready row is the enabled assignment that belongs to Marker.
- The Logic Toolbox entry attaches this reusable resource.
This diagnostic requires no Variables, so the workspace shows No Variables. Logic Components define required Per Instance and Shared Variables when their behavior needs stored values. The Object holds those values; this example needs only literal text.
A Logic resource attaches once to the same Object; a second Toolbox click keeps the existing attachment. Several different Logic Components can still respond to the same Event.
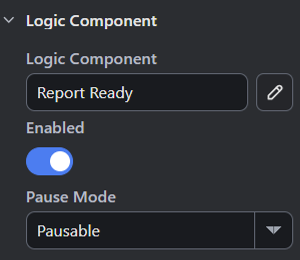
- Enabled lets Report Ready receive Events.
For a placement’s settings, open Main and select Marker in Scene Explorer. Its Logic Components section lists the inherited attachment and its Enabled switch; the Scene guide covers placement settings and Variable overrides.
Verify Execution
Save the project. Close the editor and reopen the saved file. Open Report Ready and check its connected message, then open Marker and check its enabled attachment.
Open Main and select Debug Play. In the Debugger, choose Console. Clear Find Console Output and keep All Categories selected.
Console shows one Log entry in General containing Marker ready. The running Scene has one Marker. Select Stop when you’ve checked the message.
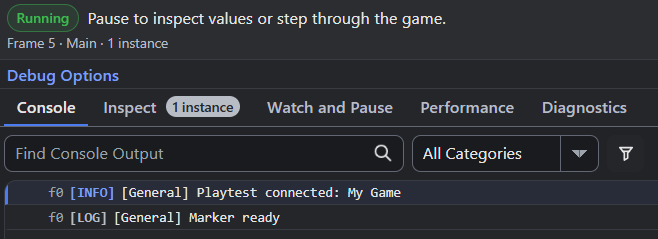
- Running identifies the live Main playtest, and the instance count is one for this saved project.
- The General Log entry contains Marker ready.
Create runs for each new instance, so another active placement will give you another creation message. A Step Event repeats during play. Use a fresh Debug Play session after editing this creation behavior.
Choose the Resource and Input Scope
| Choice | What It Changes | When to Pick It |
|---|---|---|
| Logic Component | Owns Events and attaches to a compatible Object. | Make behavior that reacts to creation, input, or another Event. Save and start fresh Play after editing. |
| Function | Takes Parameters on its Start block and runs when called. It returns one value or Nothing. | Reuse an operation from another sequence. Arguments belong to each call. |
| Literal Action field | Keeps a fixed value in the shared sequence. | Use this example’s Message, Marker ready. Commit the field before saving. |
| Per Instance Variables | Declare values required by the Logic, with starting values on its holder. | Give live instances their own values. Set Object defaults or a Scene placement’s starting override, then restart Play. |
| Shared Variables | Declare required shared values configured on the Object. | Use the Object’s shared configuration. Save and restart Play to test it. |
Function Parameters are supplied at a call. A Logic Component’s Variable requirements appear in the Object’s Logic workspace. Read an Action’s field labels and typed choices, then choose a value with the type and scope your sequence needs. Event-specific values belong to that Event’s current invocation.
Modes and Branches
Each Event can have named Modes with separate Action sequences. The example keeps Mode 1. With several Modes, the Event offers One at a Time and Combined. One at a Time uses its Starting Mode; Combined runs participating Modes in their order.
An If or loop owns its own nested sequence. Connect Actions inside the intended branch or body. A Region organizes the canvas. Use the connections to follow the path that actually runs.
Troubleshooting
| Symptom | Check and Next Action |
|---|---|
| No Marker ready message | Follow the path through Mode 1 and Print to End. Connect an unattached Action, save, and start fresh Debug Play. |
| Only one placement stays silent | Check its Active in Play Mode setting and its Logic Components Enabled switch. Restart the run after changing them. |
| Report Ready is missing from the Toolbox | Clear Search Logic Components. Check its resource type, dimension, Attach to setting, and component requirements in Logic Settings. |
| One instance prints several messages | Check other enabled Logic Components and participating Modes for the same Print Action. Keep the intended sequences and rerun. |
| The message repeats every frame | Check the Event. Use Create for this example, then start a fresh playtest. |
| Console looks empty | Clear the text search and category filter. Check message-type filters too, then look for Marker ready. |
Where to Look Next
The Print Debugger Message reference lists its exact Message, Category, and Type fields. Lifecycle Events describes Create and the other lifecycle triggers.
In Weighted Maze’s Find Route section, one Logic Component uses named Modes to run and pause a search. It shows how the same Event-and-sequence structure grows into a game operation.
Myth Engine Documentation