
Publish Desktop and Mobile Projects
Export a native source project, then build it with the target’s tools. Start with a saved My Game project. Build its Windows Electron application. Tauri and Capacitor use the same export step, then their own platform tools.
Follow the Generated Project
Myth writes a named source folder containing the wrapper and web game. Run it with the native toolchain. That toolchain also builds the distributable application. Keep the generated files together. Choose installers in the platform tools. Configure signing and store submission there too.
- Saved game
Save My Game with Main as its Start Scene.
Publish
Source projectPublish creates my-game-electron inside the chosen parent folder.
build and test
Built applicationPackage the source, then test the application outside the editor.
- Distribution setup
Configure signing and store submission in the platform tools.
Export the Source Project
Your edition must permit publishing. Save the project and pass Run validation. Start a fresh run in Main. Try the game’s first normal input. Choose a separate release destination. Keep it outside your saved project’s folder.
- Open Settings > Game Settings > Publish.
- Choose Desktop · Electron for this Windows example.
- Open Display > Window and check Title: My Game. Return to Publish.
- Under App Identity Packaged Builds, enter App ID
com.example.mygameand Version0.2.0. - Review the target’s Output settings and any icon or splash choices.
- Save the project. Select the toolbar Publish control and choose a dedicated parent folder, such as
Native Releases.
The parent now contains my-game-electron.
Open that subfolder. Find package.json, main.js, README.md and www at its root.
The game is inside www. Build the application after exporting.
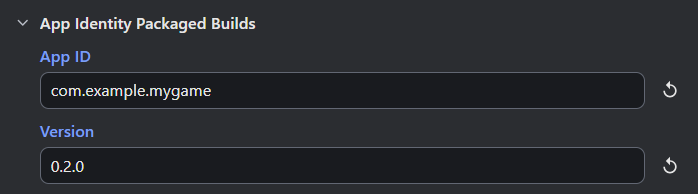
- App ID is com.example.mygame in this example.
- Version is 0.2.0 for this release.
com.example.mygame is an example identifier.
Choose your own identifier before distribution. Follow the target store’s rules.
Version labels this packaged release. Project save history remains separate.
Change Version for a later release. Export and rebuild the updated source.
Run the Generated Wrapper
Install a supported Node.js LTS release with npm, version 22.12.0 or newer. The exported Electron 42.4.1 package sets that minimum for the development machine. The application runs with Electron’s bundled runtime. Players use the packaged application without installing your development Node.js.
Reopen PowerShell after installing Node.js, then check both commands:
node -vnpm -vBoth should print a version.
Open PowerShell in Native Releases/my-game-electron, beside package.json.
Run every command below from that folder.
Read its README and run the generated structure check:
npm run validateThe validator checks the export’s required files and layout. After validation passes, install dependencies and run the game:
npm installnpm startMy Game should open at Main. Try its first normal input and compare the result with the editor run. Close the development application before packaging.
Export an EXE for Windows
In the same PowerShell folder, run:
npm run packageThis uses the generated project’s local electron-builder and writes to dist.
With My Game at version 0.2.0, the Windows output includes:
| Output | What You Use It For |
|---|---|
dist/win-unpacked/My Game.exe and its neighboring files |
Run the unpacked application and check its bundled game. Keep the entire win-unpacked folder together. |
dist/My Game Setup 0.2.0.exe |
The Windows installer. Test its installation and the installed application before sharing it. |
Launch the unpacked My Game application. Check that Main starts and the same input gives the expected result. Repeat the game’s Save and Load checks where it provides them. Then test a complete round, completion and replay as your game requires.
Set up signing for your distribution target before releasing the application. Without signing credentials, this example produces unsigned Windows output. See the electron-builder 26 signing instructions for the generated builder’s version. Keep the source project and build records alongside your release notes.
Choose Another Native Target
Select the target before exporting. Each creates its own named source folder inside the chosen parent.
| Target | Source Folder for My Game | When to Choose It |
|---|---|---|
| Desktop · Electron | my-game-electron |
Build a desktop application with Electron. The Windows steps above use this target. |
| Desktop · Tauri | my-game-tauri |
Build through Tauri’s Rust and platform toolchain. |
| Mobile · Capacitor | my-game-capacitor |
Continue in Android Studio or Xcode for a mobile application. |
Tauri
Install Node.js and the Tauri 2 platform prerequisites. On Windows these include Rust, Microsoft C++ Build Tools and WebView2. Use the required tools for the platform you’re building on.
Open a terminal beside my-game-tauri/package.json, then run:
npm run validatenpm installnpm run devCheck the game in the development application.
Use npm run build to build for that platform.
Inspect its output under src-tauri/target/release/bundle and test the built application.
Capacitor
Prepare the Capacitor 8 development environment for the platform you need. Android uses Android Studio and its required SDK tools. iOS development uses macOS and Xcode. The generated Capacitor 8 project requires Node.js 22 or newer.
Open a terminal beside my-game-capacitor/package.json.
Run npm run validate, then npm install.
Add and open the platform you’re using:
| Platform | Add Once | Open the Native Project |
|---|---|---|
| Android | npm run add:android |
npm run android |
| iOS | npm run add:ios |
npm run ios |
Build and run from Android Studio or Xcode.
When a later export changes www, run npm run sync before rebuilding.
Sync copies the web payload into the native projects.
An installed application keeps its previous payload until you rebuild and install the update.
If your export includes custom icon or splash source files in resources, follow its generated asset instructions.
Apply orientation, fullscreen behavior, permissions and signing in the native projects.
Test those choices on the target device.
Test a Built Application
Test launch, input, display size, audio after interaction, storage and external services in each supported platform’s built application.
On mobile, include touch, orientation and suspend or resume.
Check the generated RELEASE-CHECKLIST.md and STORE-LISTING-TEMPLATE.md before distribution.
If the export includes server source, follow its server instructions and host that service separately. Test the final server address from the built application. Before updating customized source, read publishing again.
Troubleshooting
| Symptom | What to Check Next |
|---|---|
node or npm is unavailable |
Install Node.js with npm and reopen the terminal. Check node -v and npm -v. |
| Electron reports an unsupported Node version | Check the development Node version against the generated Electron package’s requirement. This export needs 22.12.0 or newer. |
| Validation reports missing export files | Read the named path and restore a complete export before installing dependencies. |
| Tauri reports missing Rust or a linker | Complete Tauri’s platform prerequisites, then rerun npm run dev. |
| Capacitor opens the previous game | Run npm run sync, rebuild and install the updated application. |
| The packaged EXE fails after copying it | Restore the whole unpacked application folder and test it together. |
| An external service fails | Check its deployed address and server instructions from the export. |
Where to Look Next
Use testing a published game for the release checks and saving and loading for storage behavior. The resource reference covers the assets your release includes.
For an example of art and UI working together, read Weighted Maze: Show Terrain Picture. Compare those visible results when testing a game outside the editor.
Myth Engine Documentation