
Sprite Animation
Make Pulse alternate between the example sheet’s green and blue squares. A clip names a sequence of source frames, with its own playback settings and individual frame holds. Each Object’s Sprite component chooses its starting clip.
Prepare Two Source Frames
Open a project and stop its playtest. Import the four-color example image as a Sprite named Pulse Art. Sprite Editor explains importing and cutting the sheet.

Choose Sprite Cutting in Sprite Editor Modes. Use Grid for this regular sheet, with Columns 2, Rows 2, Margin 0 and Spacing 0. Each cell measures 32 × 32 pixels. Check the four boundaries before creating a clip.
This example uses the two upper cells. The green cell is source frame 0; the blue cell is source frame 1. Cutting supplies source frames. You still need to choose their order in a named clip.
Create the Clip
- Choose Animation in Sprite Editor Modes to open its clip list, then click Add Clip.
- Replace the inline name
newClipwithPulseand press Enter. - Click Home for 100% zoom.
- Click the upper-left green cell, then the upper-right blue cell.
- Check Animation Timeline: two entries should appear.
- Click Back to Clips, select the
Pulsecard, then click Edit Selected.
The clip now has two ordered entries. Timeline labels count positions from 1, while source frame indices start at 0. Those numbers describe different things. Repeating a source frame gives it another place in the sequence.
In Animation Properties, set Frame Rate to 8. Set Playback to Forward, and leave Loop Animation enabled so both entries repeat in their chosen order. A new clip starts at 10 fps. At 8 fps, each ordinary entry lasts 125 milliseconds before you set an individual hold.
| Setting | What It Controls |
|---|---|
| Clip Name | The name selected by components and animation Actions. Review those uses after renaming. |
| Frame Rate | Frames per second for entries whose hold is 0. |
| Playback | Forward follows the chosen order; Backward reverses it. Ping Pong travels through the sequence and back. |
| Loop Animation | Repeats the clip when enabled. Disable it for a single run. |
The Sprite’s Pixels per Meter setting affects image scale. Frame timing has its own controls. World Units and Image Scale explains how pixel density affects the displayed size.
Give One Entry a Longer Hold
- Choose Cursor Mode in Animation Tools to select timeline entries.
- Click the first entry in Animation Timeline.
- Set Hold (Ms) to
200and press Tab to commit that duration for the selected entry. - Select the second entry and check that its hold is
0. - Return to the first entry. Its field should still show
200. - Click Play above the timeline, then use Pause to pause the preview.
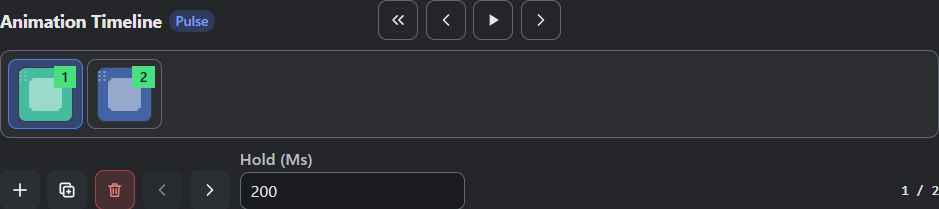
- These two timeline entries play the green source frame first, then the blue source frame.
- Hold (Ms) sets the selected entry to 200 milliseconds.
A positive Hold (Ms) value overrides the frame rate for that entry, using milliseconds as its duration. A hold of 0 uses the frame rate. For this clip, the first entry uses 200 ms and the second uses the frame-rate duration of 1000 / 8 = 125 ms.
The authored forward cycle therefore totals 325 ms. Runtime time-flow settings can change its pace. Preview the same clip on a stationary Object to check its alignment.
Use Add Frame to pick more source frames; Duplicate Frame adds another occurrence of the selected entry. Remove Frame from Clip removes an occurrence while retaining the source artwork. Move Frame Left and Move Frame Right change entry order. Repeated occurrences can have separate holds.
Choose the Object’s Starting Clip
Use a 2D Object named Marker for the example. Follow Add a Sprite Component for the attachment controls and choose Pulse Art as the resource. Place the Object in a 2D Scene named Main.
- Open
Markerand choose Components. - Select its Sprite in Attached Components and assign
Pulse Art. - Set Starting Clip to
Pulseon this Sprite component, and leave its runtime Visible setting enabled. - Inspect the component’s size and the Scene placement’s scale.
- In Game Settings, set Start Scene to
Mainso the playtest opens the Object’s placement. - Press Ctrl+S to save, then press F5 to play.
The placed Object should alternate between green and blue. Click Stop when you’ve checked it. The editor preview and the Object’s Starting Clip are separate settings.
For gameplay changes, use the Animation and Effects Actions. Choose the intended Object and Sprite component. Repeatedly restarting a clip can prevent it from advancing; change clips when the gameplay state changes.
Reopen and Check the Saved Animation
Open the saved project in a fresh editor session. In Resources, reopen Pulse Art and choose Animation to inspect the saved clip settings. If the timeline is already open, use Back to Clips to reach the list. Select Pulse and click Edit Selected.
Confirm two entries, 8 fps, Forward playback and looping. Choose Cursor Mode and select the first entry to check its 200 ms hold. Then inspect Marker again. Its Starting Clip should remain Pulse.
Check that Game Settings still starts Main, then press F5. Both colors should appear again. Stop the playtest after checking playback.
After replacing artwork or changing slicing, inspect each dependent clip. Source indices can now point at different artwork. Check origins and transparent padding when a stationary subject jumps between frames; review component size after changing frame dimensions.
| Symptom | What to Check |
|---|---|
| Named clip has no entries | Add source frames and inspect the timeline. |
| Hold field is disabled | Choose Cursor Mode, then select a timeline entry. |
| Game shows the wrong clip | Check the Sprite assignment, Starting Clip and clip-changing Logic. |
| Animation stays on its first frame | Check its entries, playback state and repeated restarts. |
| Subject shifts between frames | Compare origins and padding at a fixed Object position. |
Myth Engine Documentation