
Start a 3D Project
Build a one-metre box and frame it with the runtime Camera before adding imported models or gameplay. You can download the configured camera check to inspect the same values. Its startup Scene is named scene3d0.
Establish a Visible Scene
- Choose File > New Project, select Blank 3D, choose a name and folder, and save the project. Open its initial 3D Scene.
- Keep Object Mode selected. Choose Place, then Shapes > Box in Place Scene Content. Click an empty part of the preview once, then choose Select.
- Select Box in Scene Explorer. Under Transform > Position Meters, enter X
0, Y0, and Z0.5. Keep Scale at1on each axis. - Under Primitive, set Width Meters, Depth Meters, and Height Meters to
1. Keep Visible on and Body at Static. - Select Main Camera in Scene Explorer. Properties opens Cameras and Views. Configure the Camera using the table below.
| Camera control | Check value |
|---|---|
| Projection | Perspective |
| Pitch Degrees | 30 |
| Yaw Degrees | 45 |
| Dolly (m) | 6 |
| Field of View Degrees | 45 |
| Near Plane / Far Plane | 0.1 / 1000 |
| Look at Target | On |
| Target | Fixed Point |
| Target point X / Y / Z | 0 / 0 / 0.5 metres |
| Follow an Object | Off |
| Player Control | None (Authored Frame) |
The Camera aims at the box’s centre from six metres away. Pitch and Yaw set the viewing direction around that target. The current convention uses X and Y for the ground plane and Z for height.
- Select Look Through Camera in the preview toolbar. Confirm that the box appears in the framed view.
- In Game Settings > General, choose this Scene as the startup Scene. Save, then start a fresh Debug Play.
- Stop, close and reopen the saved project, and repeat the check.
Expected result: a stationary cube appears near the centre of the game. The configured download was checked through native field entry, a project save/load round trip, and an exported browser game. It supplies a starting camera check; imported models and animation need their own checks.
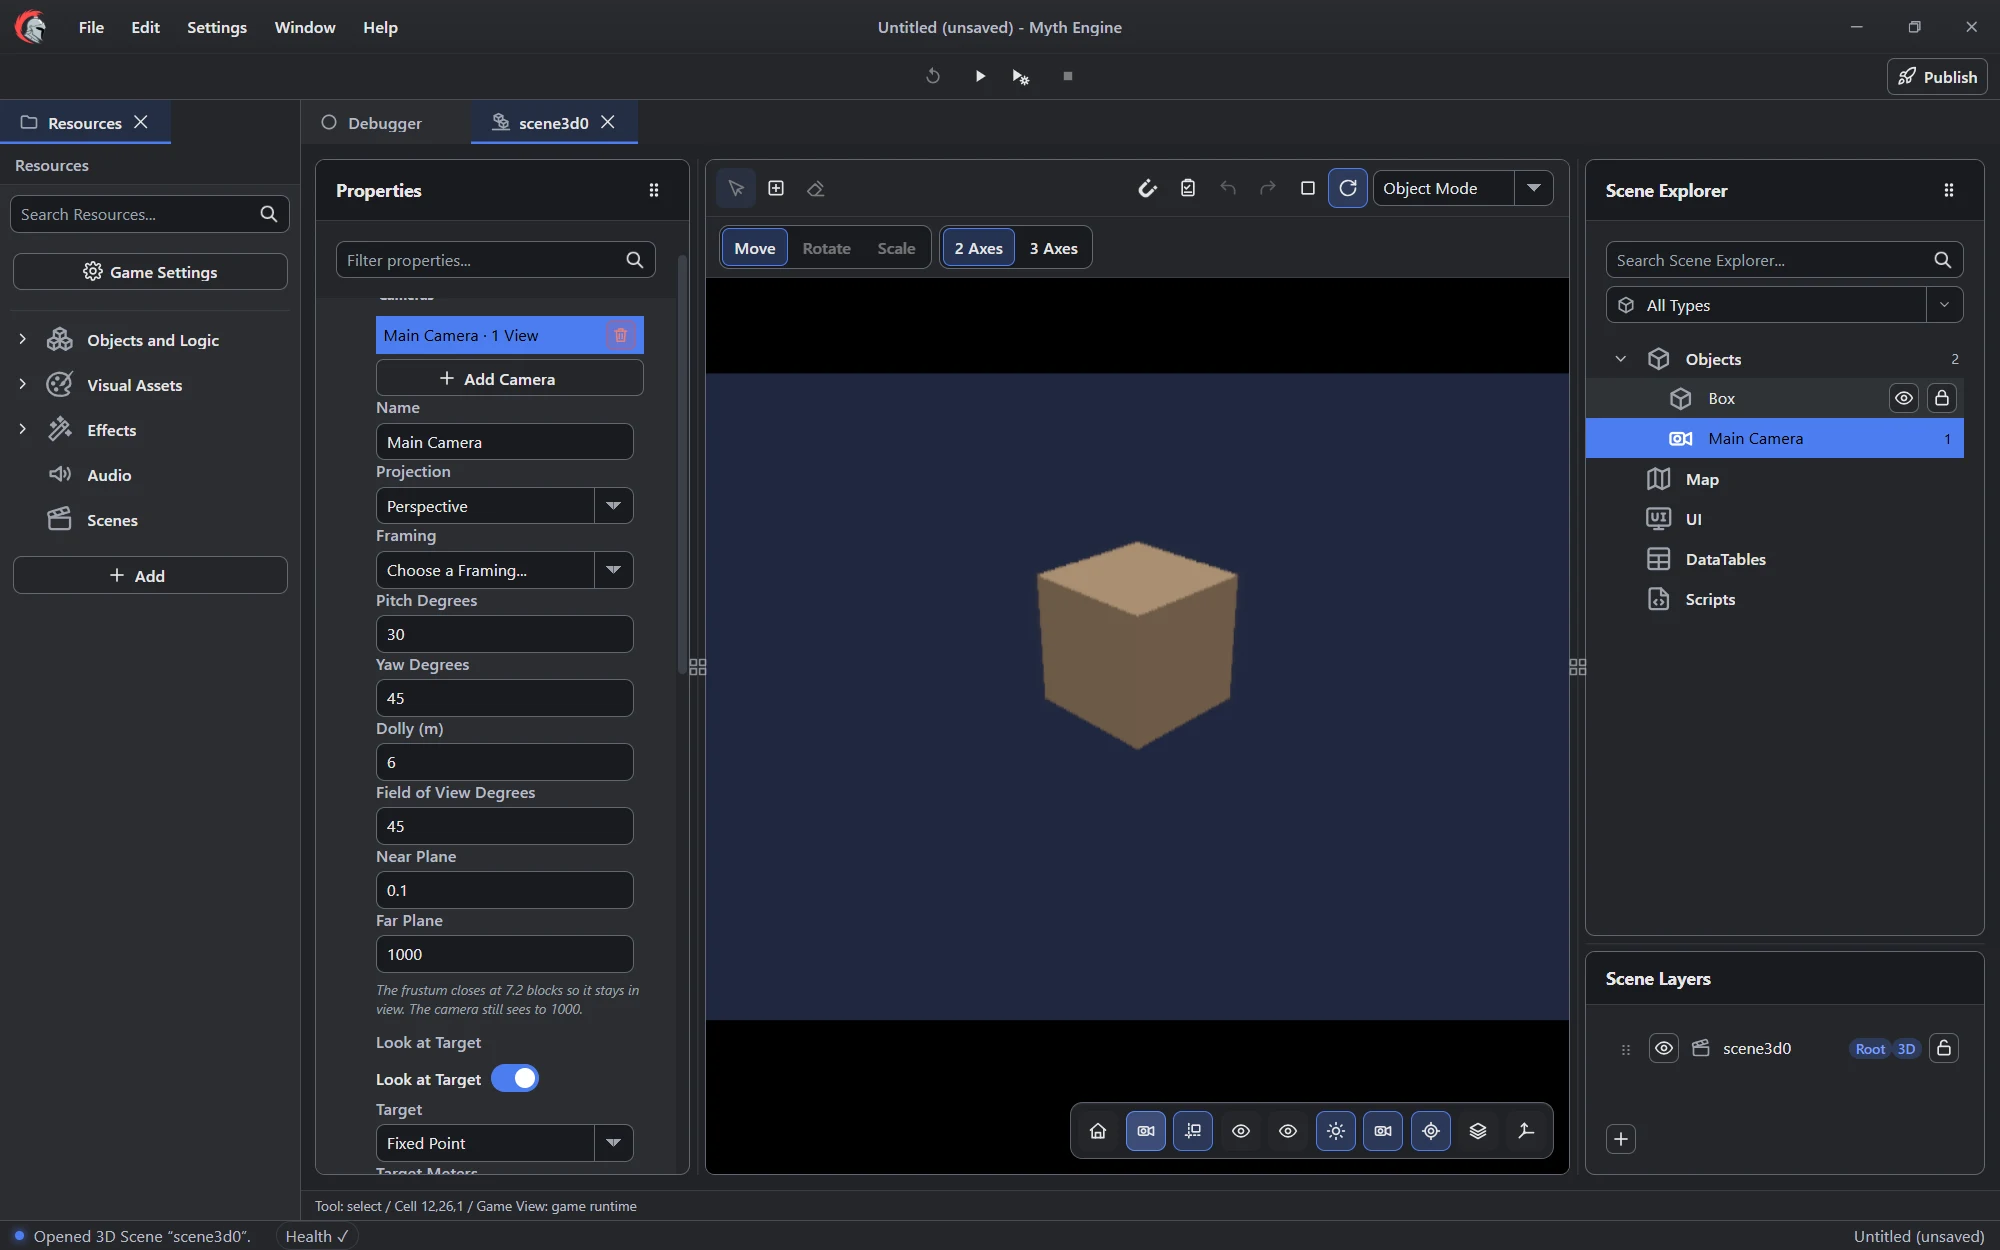
- The Camera uses Pitch 30, Yaw 45, and Dolly 6 metres.
- The camera view contains the box; orbiting the authoring view is a separate operation.
- Select Main Camera in Scene Explorer to return to its controls.
If the view is empty, compare the box position with the fixed target first. Check the startup Scene, Visible state, and clipping planes before changing its size. 3D Scene Editor covers additional placement and world tools.
Match Logic to the Dimension
A Logic resource’s 2D or 3D dimension affects which Action blocks are offered. Object compatibility is still defined separately through nominal or structural contracts.
Choose the appropriate 3D Actions and component fields. A 2D movement example does not establish the same coordinate or physical behavior for a 3D project.
Build in Small Passes
First verify appearance and camera framing. Then add motion, interaction, and state. Finally add additional lights, materials, animation, and more demanding effects. Test each pass in the running game.
3D resources include Models, Materials, IK Setups, and Animators where available. The resource reference marks categories associated with 3D mode. The component reference describes the supported component fields.
Inspect a Simple Primitive
For an existing 3D Object in a 3D Scene, open Components mode and select its Primitive component. Add one through Component Toolbox when appropriate. Begin with these settings before introducing imported geometry:
| Setting | Initial Check Value | Meaning |
|---|---|---|
| Shape | box |
A simple shape for a visibility and contact check. |
| Width / Depth / Height | 1 / 1 / 1 metre |
Primitive geometry dimensions, independent of Object scale. |
| Opacity | 1 |
Fully opaque. |
| Visible | Enabled | Geometry draws; collision remains a separate setting. |
| Body | static |
A stationary body for the initial check. |
| Material | Unassigned for this check | Inspect the primitive’s base appearance before introducing a material override. |
Set the placement’s Transform scale to 1 on each axis and record its world position. Use Game View to inspect the runtime camera’s framing, then run the Scene. A box drawn in the authoring viewport does not prove that the game camera points toward it.
Expected result: the active placement creates visible one-metre geometry before scale. The current 3D project convention uses X and Y for the ground plane and Z for height; camera-relative directions depend on its orientation. Consult the selected project’s convention when opening older files.
Check a Camera and Clipping
Select the Camera component and confirm its dimension is compatible with the Scene and Enabled is on. Perspective uses Field of View; orthographic framing uses Orthographic Height. Near and Far planes clip geometry outside the visible depth range. Their default schema values are 0.1 m and 1,000 m respectively, with perspective Field of View 45°; presets or Scene settings can supply different values.
Move or aim the camera deliberately instead of enlarging invisible geometry until it happens to enter the view. An imported Model adds another connection: the 3D Model component must reference the intended Model resource, and material overrides can alter its appearance.
Troubleshooting
| Symptom | Check and correction |
|---|---|
| Content appears only in the editor | Check start Scene, runtime camera orientation, active state, and starting visibility. |
| Nearby geometry disappears | Compare distance to the Near plane; inspect camera placement and model scale. |
| Distant geometry disappears | Check Far clipping and camera framing before changing Object size. |
| A primitive falls unexpectedly | Inspect Body, gravity, physical settings, and motion Logic. |
| 3D entries are absent | Confirm project dimension and the applicable advanced visibility controls. |
| An Action is unavailable | Match the Logic dimension and the target’s required component contract. |
Use the Primitive Reference, 3D Model Reference, and Camera Reference for limits and writable fields. Verify rendering, then contact, then gameplay as separate checks.
Myth Engine Documentation