
Sprite Editor
Import a PNG into Marker Art, then use it on an Object. The resource holds the media. Its Sprite component controls the picture’s placement, size, visibility and starting clip.
Prerequisites
Open a project and stop its playtest. Use an Object and Scene for the display check. Download the original four-color example image to follow the pictured example. It measures 64 × 64 pixels.

You can use your own PNG instead. Choose an export with the intended transparency and resolution; its frame dimensions will differ from this example.
Import an Image
- Click Add below Resources to open Add Resource.
- Search for
Spriteand click Add Sprite. - In Create Sprite, enter
Marker Artin Name, then click Create. - The new Sprite opens in Import/Create, where the left panel’s Mode should be Import.
- Set Source Type to Sprite Sheet / Single Image.
- Click Import Single Image… and choose the downloaded PNG.
- Check that Source names
four-cells.pngand the preview shows all four colors.
The whole 64 × 64 image is now frame 0.
To reopen this resource later, expand Visual Assets > Sprites in Resources and double-click Marker Art. For an existing Sprite, choose Import/Create in Sprite Editor Modes.
Configure Grid Frames
In Sprite Editor Modes, choose Sprite Cutting to divide the four-color example into its regular grid. Cut it now, before assigning it to an Object.
- Choose Grid for Slicing Mode.
- Set Columns to
2and Rows to2, then commit each field with Tab. - Keep Margin and Spacing at
0; the example has no outer border or gaps between its cells. - Inspect each boundary to check that every cell contains one complete colored square, with no neighboring art.
There are now four 32 × 32 frames, numbered from 0. Frame 0 is the green square at the top left.
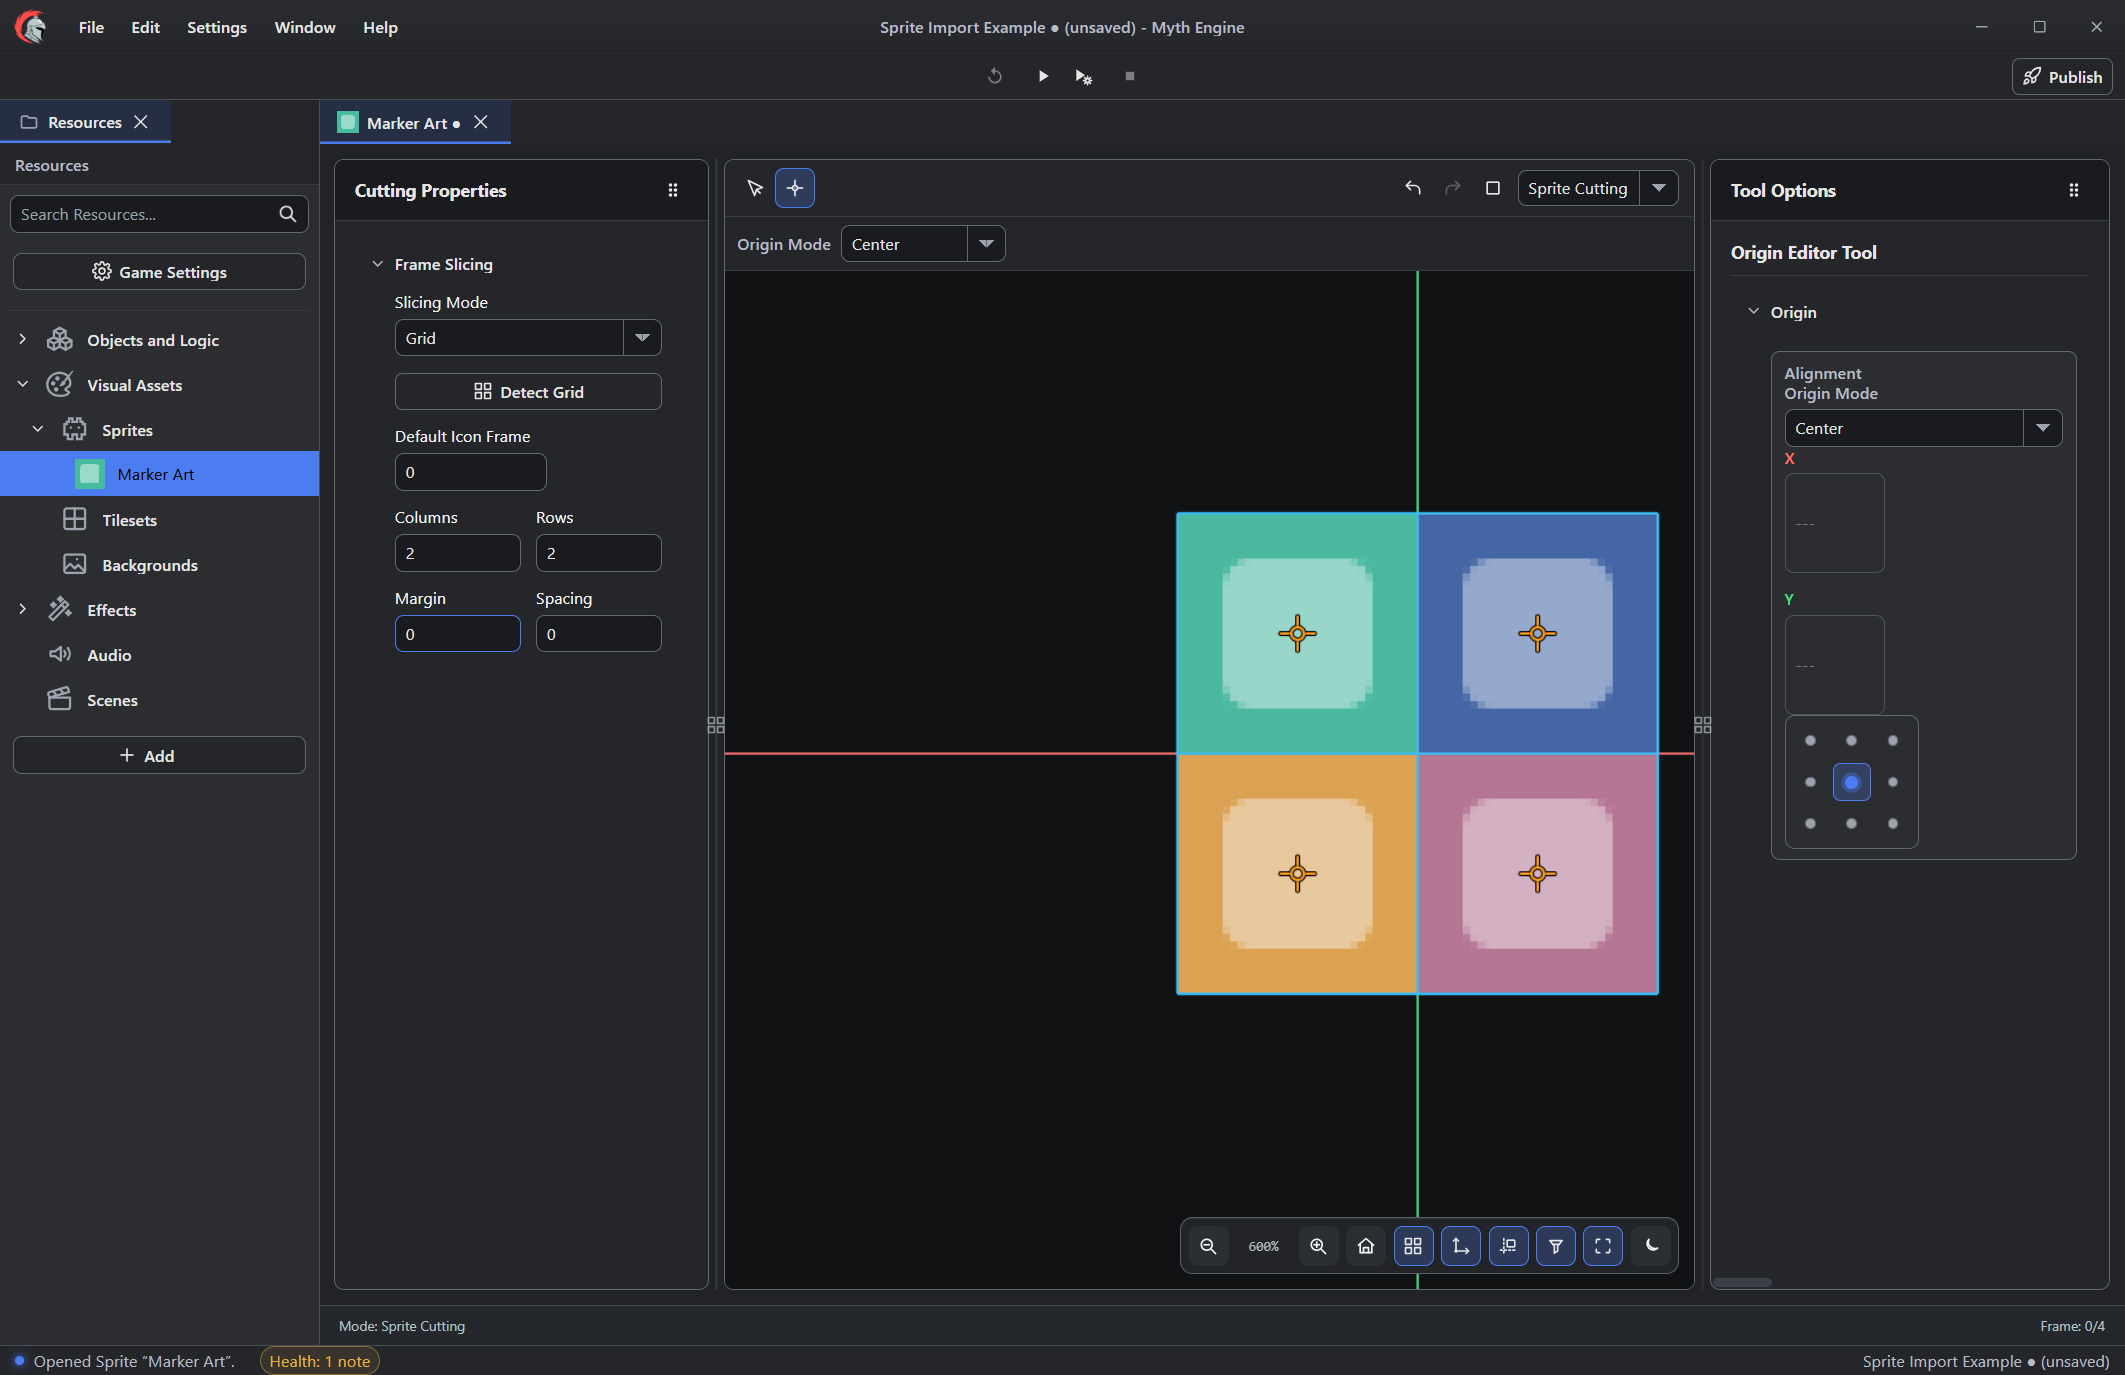
- Sprite Editor Modes switches between importing, editing pixels, cutting frames and preparing animation.
- Use Grid for this sheet.
- Columns and Rows define the number of source cells; this example uses two of each.
- Margin and Spacing use source pixels.
- Default Icon Frame changes the thumbnail shown for this resource in the Resources tree.
Use these arrangements for a source of the same size:
| Image Layout | Columns | Rows | Margin | Spacing | Result |
|---|---|---|---|---|---|
| One whole image | 1 |
1 |
0 |
0 |
One 64 × 64 frame. |
| Four-color example | 2 |
2 |
0 |
0 |
Four 32 × 32 frames. |
Margin describes the outer border in source pixels; Spacing describes gaps between cells. Match those values to your own export. Detect Grid offers an estimate that still needs checking against the image.
Explicit Rects supports irregular frame regions. Use it when frames cannot share one grid; changing the column count won’t describe an irregular layout.
Default Icon Frame chooses the Sprite’s thumbnail in Resources. It uses frame numbers starting at zero. The Object’s displayed frame and starting animation have their own settings.
Choose the Appropriate Import Source
Choose Source Type to match your files: one image, a sequence, or several sheets.
| Source Type | Files to Supply | What to Review |
|---|---|---|
| Sprite Sheet / Single Image | One image containing static art or a sheet. | Frame boundaries, borders, gaps and transparency. |
| Image Sequence | Separate image files for ordered frames. | File order, cell dimensions, alignment and padding. |
| Multiple Sprite Sheets | Several sheet images for one Sprite. | Source arrangement and the resulting frame regions. |
Keep your original art exports outside the project. Keep those exports available when comparing a revised sheet’s cell arrangement with the cutting settings saved in Myth.
Check Origins and Animation
A frame’s origin defines its alignment. Its coordinates use frame pixels. Before cutting the supplied 64 × 64 image, its centered origin is X 32, Y 32. Each 32 × 32 frame in the cut example has its center at 16, 16.
- In Sprite Cutting, choose Select Frames, then click the green frame in the preview.
- Choose Origin Editor Tool.
- Check Origin Mode and the X and Y fields in Tool Options.
- Choose Bottom Center to place this frame’s origin at
16, 32. - Choose Center again for this example. Its fields return to
16, 16.
Blank origin fields can mean no frame is selected, or selected frames have different values. Check the selection first.
Consistent origins help keep an animated subject aligned. Transparent padding can still shift the visible art within its cells, so inspect the subject as well as the origin. Review both before adding movement Logic to the Object.
Use Animation for clips. Pixel Editor edits image content. Sprite Animation covers clips, frame rate and holds. Set the Object component’s Starting Clip to choose its initial animation, then confirm playback in Play.
Assign and Verify the Sprite
The import is ready for an Object. The Object Editor guide covers creating both resources, attaching the Sprite and setting its size.
- Open your Object and choose Components. Add or select its Sprite component.
- Assign
Marker Artand keep its runtime Visible setting enabled. - Check its local Size X / Y and Default Visual Size, then inspect a Scene placement.
- Open Game Settings and select that Scene as Start Scene.
- Press Ctrl+S to save. Press F5 to play, check the image, then click Stop.
- Reopen the saved project in a fresh editor session to check the Sprite source, cutting settings and Object assignment.
Saving retains the imported media with the project. Keep its document and companion media together, as explained in Projects and Resources. Its pixel dimensions and its displayed size are separate: component size, pixel density and placement scale affect the result. World Units and Image Scale explains that relationship.
Collider geometry is separate too. A transparent image border doesn’t set the Object’s contact bounds.
Reimport and Review Dependents
A file import records a source link. Import/Create names the linked file beside Remove Link and Reimport Changed from Folder….
Choose Reimport Changed from Folder…. Select the folder containing the newer export. A linked replacement with the same image dimensions keeps the cutting work. Review the updated image afterward.
Using the source row’s Import button replaces the image as a fresh single-image import. It starts again with one whole-image frame. Check the cutting settings before accepting the image as your revised sheet.
Remove Link forgets the reimport association and keeps the imported image. The source link stores the filename and change-detection metadata; the project retains the media itself.
After changing image dimensions or slicing, inspect dependent Objects. On each dependent Object, check the selected frame, origins, starting clip, displayed size and alignment with its Collider. Save and reopen to verify the replacement and assignments.
Troubleshooting
| Symptom | Check |
|---|---|
| Imported art appears only in Resources. | Assign the Sprite through an Object’s Sprite component and check its Visible setting. |
| A static image is split into pieces. | Use Grid with one column and one row for the whole image. |
| Frames include borders or neighbors. | Compare Columns, Rows, Margin and Spacing with the source export. |
| A stationary animated subject jumps. | Inspect its per-frame origins and transparent padding. |
| Resources shows another pose. | Check Default Icon Frame, then verify the Object’s frame or clip separately. |
| Art has the wrong displayed size. | Compare component size, pixel density, placement scale and camera framing. |
| A revised export hasn’t appeared. | Check the source link, selected folder and filename, then inspect the import result. |
For a game using reusable Sprite resources, see The Map and the Sidebar. The Animation and Effects Action Reference describes runtime animation selection and timing.
Myth Engine Documentation